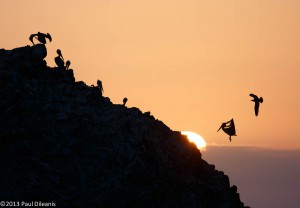
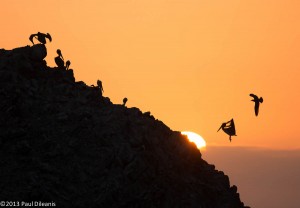
The Flight of Icarus – Photographing into the sun
The title of this photograph and article does not represent the danger to the pelican in flying too close to the sun, but represents the challenges a novice photographer faces when photographing into the sun. To create dynamic images it is often necessary to photograph in difficult light. Following the tips below for photographing into the sun will hopefully bring you more success in similar situations.
The challenges posed by this image are:
- Getting the correct exposure
- Having a fast enough shutter speed to freeze the action
- Color and white balance
If you are in the habit of shooting with your DSLR set to the auto mode there is a high probability that today’s cameras will get the exposure correct. However if you leave the choice of shutter speed up to the camera you may find that the camera chooses a shutter speed which is too slow to stop the movement of a bird in flight. Leaving the white balance set to auto (AWB) may also result in the colors of the sky being subdued and not as brilliant as you envisioned.
The camera I used was a Canon 5DmkIII with a 400mm/f5.6 lens mounted on a tripod with a gimbaled head. To create this image I set the camera mode to shutter priority, ISO to auto (I’ll explain in a moment), white balance was set to Daylight and the picture style was set to Landscape.
By setting the camera to shutter priority I was able to select a shutter speed of 1/1000 sec. to freeze the action. In this mode the camera will set the aperture automatically for you.
Because I was tracking birds in flight at sunset with rapidly changing lighting conditions I set the ISO to auto. In the auto ISO mode the camera was able to select the ISO based on my desired shutter speed. This is a technique I also use for action photos when I need maximum flexibility and need to keep my eye on the subject. ISO’s for this series of shots varied from 100 to 800 depending on whether the sun was in the image or not.
Setting the camera white balance to Daylight preserved the warm colors of the sunset and using the Landscape picture style made the colors more saturated and gave a little more contrast. If I had taken the photo in auto white balance with the picture style in the default Standard the image would have probably looked like this.


These corrections can be made in post processing with RAW files. However, for those of you who shoot JPEG or need to have a file to upload quickly it is always best to get the image color and exposure correct in the camera.
When composing images taken directly into the sun I find it helpful to place the sun behind an object such as a rock or tree. This reduces the relative brightness of the sun to the surrounding scene. In this image you will see that the sun is not only behind a rock, but also descending into a fog bank.