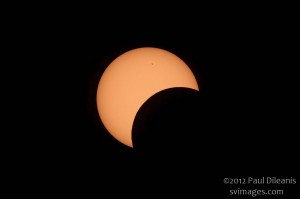
On Thursday October 23rd there will be an opportunity to view a partial solar eclipse in the northern hemisphere. If you have never photographed a solar eclipse this is an opportunity get some awesome photographs as well as to prepare for the total solar eclipse on August 21, 2017. (See tips for photographing a solar eclipse at the end of this post.)
In order to photograph a solar eclipse it is necessary to have a solar filter for your camera or telescope. Photographic neutral density filters are not recommended since they do not block out the more harmful wavelengths of UV light when looking at or photographing the sun. I recommend purchasing a true solar filter.
Solar filters will have an optical density of 5.0. This means that they block out 99.9999% of the suns visible light. In addition, they block out 100% f the sun’s harmful radiation. While photographic filters with an optical density of 3.8 (15 stops) can be used to photograph an eclipse they do not block out the harmful radiation and improper use can result in eye damage.
An economical solar filter can be made by purchasing a sheet of solar film and making your own filter. There are two type of solar film available, black polymer and Baader astro solar film.
- Black polymer solar film will provide a more pleasing and natural Yellow-Orange image of the sun. This color also offers more contrast and clarity than other solar films. It is also stronger and more durable than other thin film solar filters. Black polymer sheets in 6”x6” size are available locally from San Jose Camera and Video.
- Baader AstroSolar film leaves the sun a more natural white, provides a brighter image, reveals sharper and more contrasty detail.
The Baader planetarium has posted the following information on how to make your own solar filter: “Making a solar filter”
Do not wait till the last minute to purchase a solar filter. Many sources run out in advance of this material. By purchasing the filter now you will be able to use the filter to photograph the upcoming partial solar eclipse and you can store it safely to use for the total eclipse in 2017.
There are many great tools and resources available online for photographers to determine the dates, times and locations for photographing an eclipse. I use a combination of The Photographer’s Ephemeris, Google Earth and Stellarium to plan an eclipse shoot in advance.
During this partial solar eclipse the Moon covers only parts of the Sun as seen from San Jose. Timeanddate.com has a simple animation showing approximately what the eclipse will look from San Jose (weather permitting): Timeanddate.com:http://www.timeanddate.com/eclipse/in/usa/san-jose?iso=20141023
In San Jose, CA the eclipse begins at 1:55 PM with the maximum eclipse occurring at 3:18 PM. The eclipse ends at 4:34 PM.
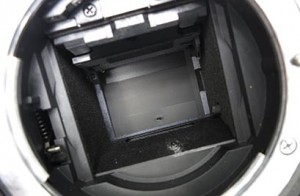
There are some very important safety tips to remember when photographing an eclipse. Not observing these can result in serious eye damage or damaged cameras. This is a photo of a DSLR with a hole burned in the shutter. The photographer was fortunate not to have damaged their eyes.

Featured Gallery: Annular Solar Eclipse May 20, 2012
[photoshelter-gallery g_id=”G0000yMZDFmMQYFc” g_name=”Annular-Eclipse-2012″ width=”600″ f_fullscreen=”t” bgtrans=”t” pho_credit=”iptc” twoup=”f” f_bbar=”t” f_bbarbig=”f” fsvis=”f” f_show_caption=”t” crop=”f” f_enable_embed_btn=”t” f_htmllinks=”t” f_l=”t” f_send_to_friend_btn=”f” f_show_slidenum=”t” f_topbar=”f” f_show_watermark=”t” img_title=”casc” linkdest=”c” trans=”xfade” target=”_self” tbs=”5000″ f_link=”t” f_smooth=”f” f_mtrx=”t” f_ap=”t” f_up=”f” height=”400″ btype=”old” bcolor=”#CCCCCC” ]
More information on how to photograph a solar eclipse can be found at the Starcircle Academy website and Nikon websites listed below.
Starcircle Academy: http://starcircleacademy.com/2012/04/solar-filter/
Nikon: http://www.nikonusa.com/en/Learn-And-Explore/Article/h20zakgu/how-to-photograph-a-solar-eclipse.html
Tips for photographing a solar eclipse
WARNING: Never stare directly at the sun without a proper, safe filter. Failure to do so can result in serious eye injury or permanent blindness. No. 14 welder’s glass filter is acceptable, but ordinary sunglasses and polarizing or neutral-density filters used in regular photography are not safe and should not be used.
San Jose Camera has Solar Eclipse viewing filters and Black Polymer filter squares to make your own solar filter for your camera.
- Look for a clear, unobstructed view of the sky. If you are planning to use a DSLR camera, choose a telephoto lens with a focal length of 400 millimeters or more to give you a decent size image of the sun’s disk in the frame.
- Use a sturdy tripod or mount to support your camera setup. Don’t try to hand-hold it.
- Set the camera to its highest resolution to capture as much detail and color information as possible. Consult your camera manual on how to change the settings.
- Remember to focus carefully to get sharp images. Use your camera’s Live View feature, if it has one, to achieve accurate focus. You can use the sun’s edge or sunspots (viewed through the solar filter) to focus.
- To minimize vibrations that may blur your images, use your camera’s mirror lock-up feature before each shot. You should also operate the shutter with a remote cable release to eliminate camera shake. Keep your exposures short by using a high ISO setting (400 or higher).
- Bracket your exposures — Take a series of shots at various shutter speeds and/or apertures. This will increase your chances of getting the correct exposure.
- Have a fully charged camera battery and keep a spare one handy.
- Be sure to test your camera setup before the eclipse. If possible, take some trial shots of the sun to give you an idea on what exposure settings to use with your particular telescope/filter combination.
- When composing your shot, try to include some interesting elements in your foreground.
- After the eclipse, be sure to downloadyour images to your computer and back-up all your files right away. Use editing software such as Adobe Photoshop to enhance the images’ brightness, contrast, sharpness and color balance. You can also blend a series of the frames to create an eclipse sequence.
How to safely view a solar eclipse
Eclipse glasses
These are glasses made specifically for viewing solar eclipses, usually made of cardboard. The lenses are solar filters that remove 99.99% of the Sun’s visible light and 100% of the harmful UV rays. They’re usually made of either Mylar or black polymer, the latter being the safest. Make sure they have the “CE” label on them, i.e. “Certified Eclipse”.
Welder’s glasses
Welding glasses used to protect a welder’s eyes from damage can protect your eyes during a solar eclipse. They range on a scale of #1 to #14, with #14 being the darkest shade of glass. If you’re going to use welder glasses, only get the #14 ones. Anything less and you could still damage your eyes. Stacking two lower grades of glass will not provide adequate protection against the Sun.
Pinhole Projectors
The safest way to view a solar eclipse is using a homemade pinhole projector. Why is it the safest? Because, you are not viewing the Sun directly, you are just viewing a projection of it.